

Getting your new internet service up and running is easier than ever with this step-by-step guide to WOW! self-install and modem activation.
WOW! self-installation is presented as a quick, easy way for subscribers in serviceable areas to set up their new internet modem and equipment without a professional technician. It is ideal for renters, new movers, or those seeking a flexible setup.
Our guide provides a clear, step-by-step walkthrough for activating your WOW! modem, verifying all connections, and optimizing your new Wi-Fi network.
Key Takeaways
- Choosing WOW! self-install is a better option for those who prefer convenience and want to avoid waiting for a technician.
- Have your self-installation kit, account number, and an active coax outlet on hand before you begin.
- For a better, faster activation experience, visit wowway.com/selfinstall directly from your connected device.
- You can use your own compatible modem if it’s on WOW!’s approved list.
- Place your modem in an open, central spot on a higher shelf to optimize coverage and performance.
- Using your modem’s admin page (192.168.0.1) to customize your Wi-Fi channel and security settings will provide a better, more secure connection.
- You can resolve common activation issues by unplugging your modem for 30 seconds and verifying that all cable connections are secure.
What Is WOW! Self-Install and Why Choose It?
WOW! self-install is a do-it-yourself service option that allows customers to set up their new WOW! Internet, TV, and phone services in their home without needing a professional technician visit. This streamlined process is designed for a simple WOW! internet setup and allows users to get connected on their own schedule.
Opting for the self-install kit provides several advantages:
- Convenience: You can set up your services whenever you want, day or night, without the need to coordinate with a technician's availability.
- Cost Savings: Self-installation kits typically cost less than professional installation, saving you money on your initial setup.
- No Scheduling Delays: You avoid the hassle of booking appointments and waiting for a technician to arrive within a specific time window.
Activation and Advanced Options
For a smoother activation experience, use the provided self-installation kit with the online activation portal. The final step in getting your services live is to navigate to wowway.com/selfinstall to register your new equipment and finalize the connection.
WOW! offers an optional whole-home Wi-Fi solution for better, more comprehensive Wi-Fi coverage. The advanced system utilizes a mesh network of extenders to ensure a strong, reliable signal reaches every corner of your house. Whole-home Wi-Fi eliminates dead zones and delivers better support for multiple devices.
What Comes in the WOW! Self-Installation Kit?
The WOW! self-installation kit includes all the components needed to connect your services quickly and efficiently.

Contents of the Self-Installation Kit
What you should find inside your box:
- Coax Cable: This round, threaded cable connects your new modem to the wall outlet. It carries the internet signal into your home and is crucial for your service.
- Ethernet Cable: A cable with clip-in connectors at each end. This connects your computer or gaming console directly to the modem for the fastest, most stable wired internet connection.
- Modem and Power Cord: The modem is the main piece of equipment (the gateway) that receives the internet signal and broadcasts your Wi-Fi network. The power cord connects the modem to a standard electrical wall outlet.
- WOW! Installation Guide: A step-by-step booklet that provides visual instructions and clear directions on how to set up all the equipment correctly. It also includes support contact information if you run into issues.
Quick Tip: Check your kit as soon as it arrives to ensure no missing components. If anything is missing, contact WOW! customer support and request a replacement item.
How to Self-Install Your WOW! Internet Step by Step
WOW internet setup is straightforward and can be completed in just a few steps.
1. Wired Modem Setup
Follow these steps to set up and activate your wired modem (compatible with WOW! services).
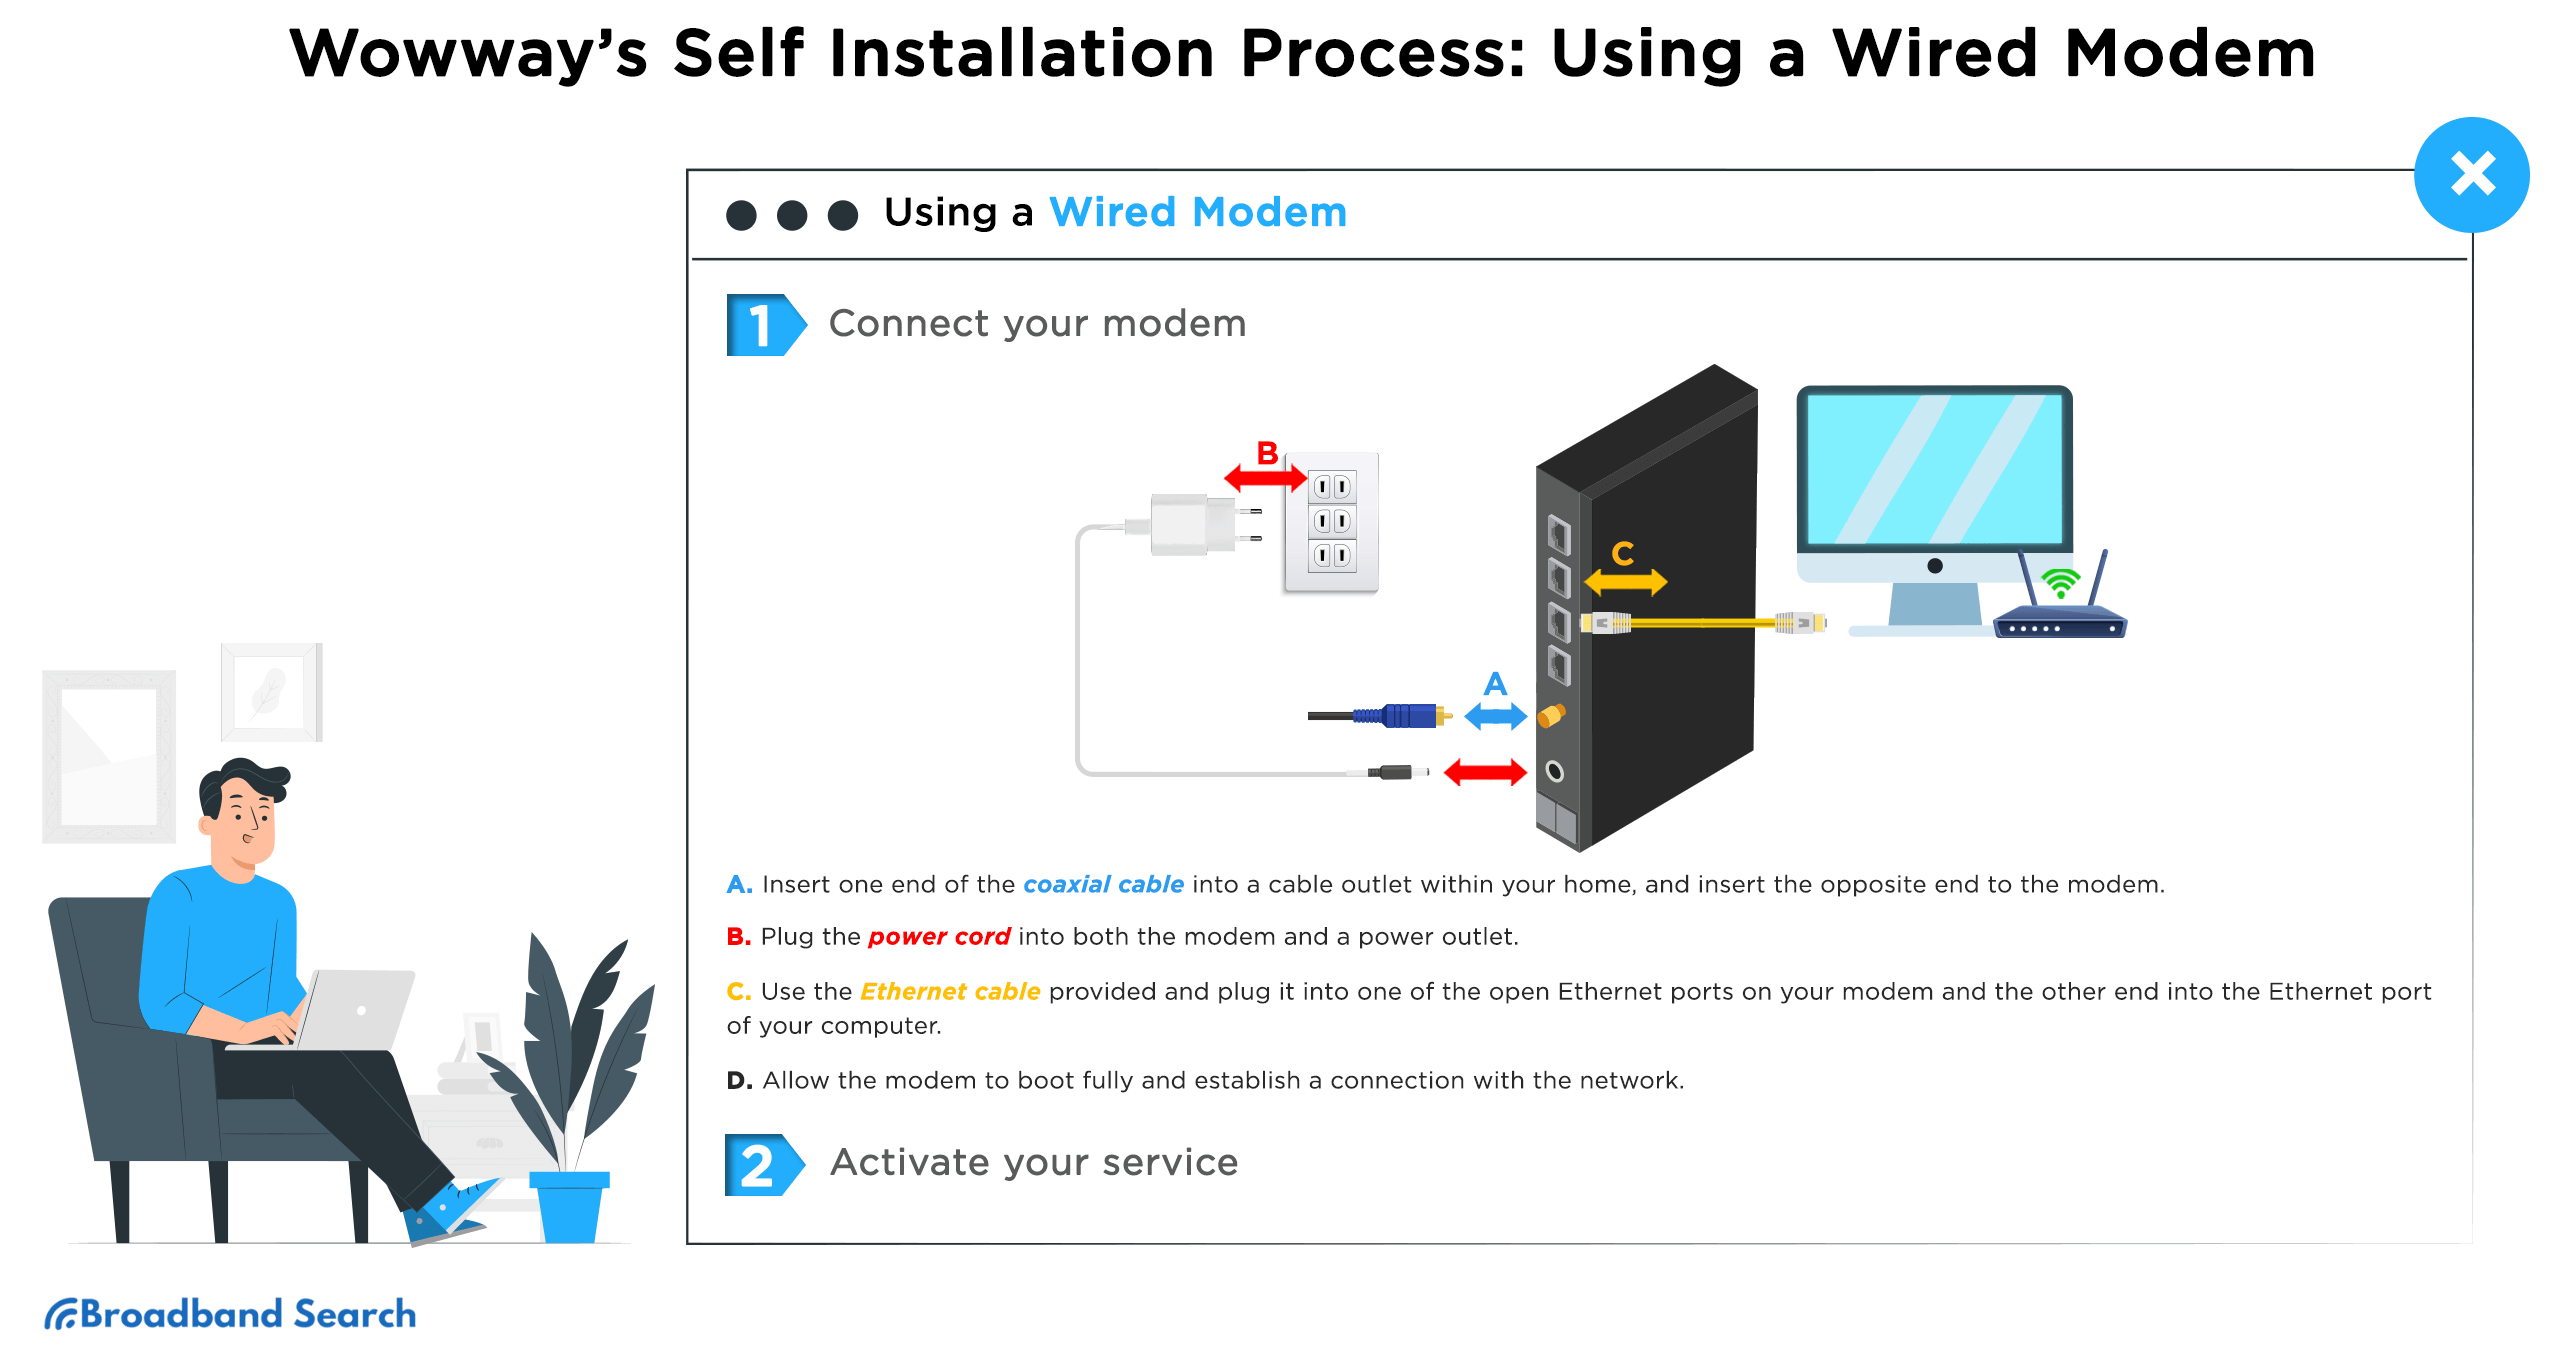
Connect the Modem
- Find the cable outlet: Locate a coaxial cable wall outlet.
- Connect the coaxial cable: Attach one end to the cable wall outlet and the other to the cable In or RF in port on the back of your new WOW modem.
- Connect power: Plug the modem's power adapter into an electrical outlet and into the modem's "Power" port. The modem is ready when the online light is solid. It may take several minutes.
- Connect the Ethernet cable to the Ethernet or LAN port. Connect one end of the Ethernet cable to the modem's Ethernet port and the other end to your computer.
- Activate your service. Launch your preferred internet browser. Go to wowway.com/selfinstall. This page will guide you through the activation process using your account information. Follow the prompts.
💡 Learn more about improving Wi-Fi coverage on BroadbandSearch
2. Wireless Modem Setup (Wi-Fi Modem)
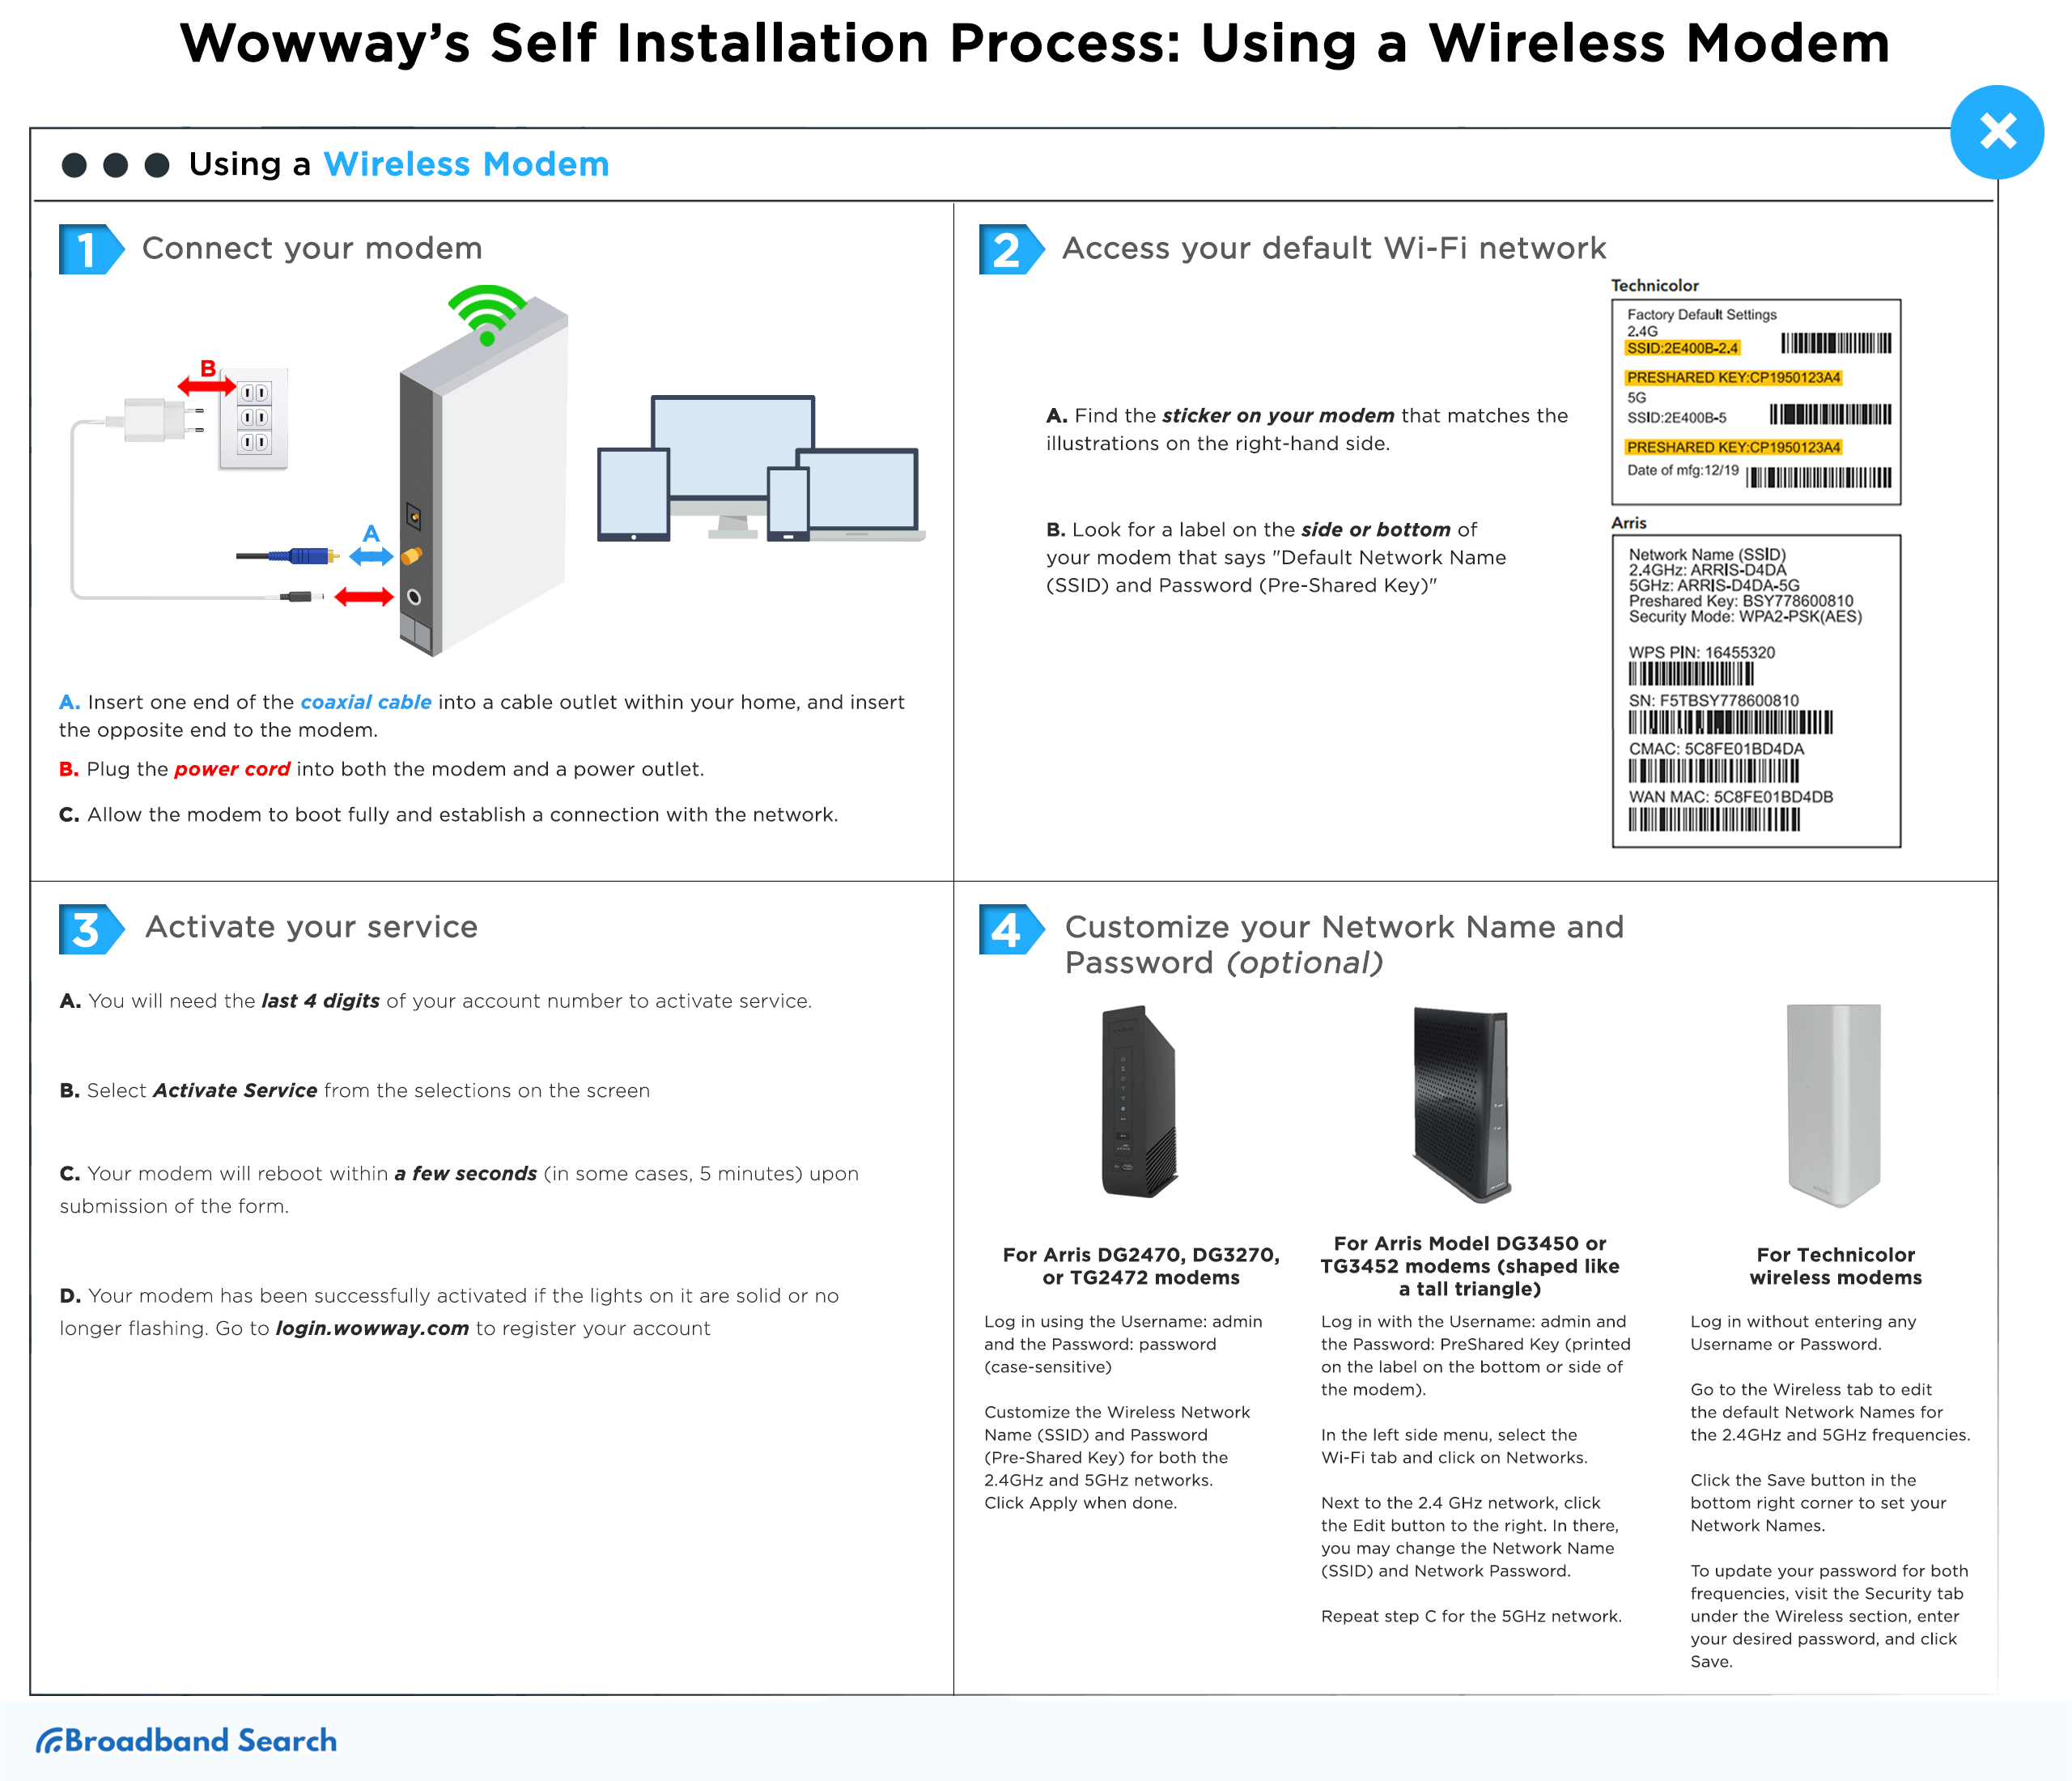
1) Locate the sticker on the top, side, or bottom of your new modem. This label contains your default network information.
2) Find the following details on the label:
a. SSID (Network Name): The name of your Wi-Fi network (e.g., MyAstound_XXXX).
b. Wi-Fi Password / Security Key: The default password needed to connect to the network.
3) Connect a device (smartphone, tablet, or computer) to the modem:
a. Wirelessly: Go to your device's Wi-Fi settings, select the SSID from Step 2, and enter the Wi-Fi password.
b. Wired (Optional): Use an Ethernet cable to connect your computer directly to one of the modem's LAN ports.
4) Open a web browser and navigate to the activation portal wowway.com/selfinstall. The site should detect your new modem.
5) Follow the on-screen prompts to activate your service. You may need to provide your account information or phone number associated with your service to verify your identity.
You can customize your modem settings to create a unique network name (SSID) and password for your new Wi-Fi network.
3. Using Your Own Modem (Custom Modem Setup)
You will need to ensure you have a compatible modem from the approved list and an Ethernet cable. A cable is required to connect the WOW internet compatible modems to your router.
Activation Steps
- Connect the coaxial cable from your wall outlet to the back of your modem.
- Plug the modem's power cord into an electrical outlet.
- Wait for the modem to power up and the indicator lights to stabilize. It may take a few minutes.
- Connect your computer or wireless router to the modem using the Ethernet cable.
- Open a web browser, follow the activation prompts, then register and verify.
- In most cases, you won’t need to call Wowway; the online activation tool is enough.
Remember to register your account at login.wowway.com and run the connection check to ensure your service is fully operational.
💡 Tip: If the automatic activation process fails or you experience connection issues, unplug your modem's power cord for 30 seconds, plug it back in, and wait for the lights to stabilize before retrying the steps.
4. WOW! Modem Activation
Follow these step-by-step instructions to ensure a smooth WOW! modem setup.
Preparation: Wait for Stable Lights
To ensure a better setup experience, make sure your modem is fully ready before starting the activation process.
- Plug in your modem and connect the coaxial cable.
- Wait until all the indicator lights on the modem become solid green or blue. This may take several minutes. Do not proceed to the next steps until the lights are stable. Blinking lights usually means it is still searching for a signal.
Connect Your Device
Disabling mobile data and connecting exclusively to your new Wi-Fi network or via an Ethernet cable is a better way to ensure seamless communication with the modem during activation.
IssueSolutionModem not detectedCheck that your device is directly connected to the modem using an Ethernet cable (not Wi-Fi). Ensure mobile data is disabled on your device.No lightsTest a new electrical outlet or power source to confirm the modem is receiving power. How to Optimize Your Wi-Fi for Best Performance
To optimize your Wi-Fi for better performance, a few key adjustments to your equipment placement, router settings, and network usage can significantly improve speed and reliability.
1. Choose the Best Placement for Your Modem/Router
The physical location of your equipment significantly impacts signal strength and coverage.
- Central location: Place the modem in a central area of your home to evenly distribute the signal.
- Elevated position: Set the device on a high shelf or table, rather than on the floor.
- Away from obstructions: Keep the modem away from thick walls, large metal objects, aquariums, and major electronics, which can absorb or interfere with the signal.
2. Adjust Modem Settings
Customize your network settings for security and ease of use.
- Access your modem/router settings by opening a web browser and entering the default gateway address, typically 192.168.0.1.
- Change the default Network Name (SSID) and Password to something unique and secure.
3. Check for Interference Sources
Avoid placing the modem near certain everyday household items.
- Microwave ovens
- Cordless phones
- Bluetooth speakers
- Other wireless devices operating on the same frequency
4. Use Both Bands Effectively (Dual-Band Routers)
If you have a dual-band router, you can leverage two different frequencies for different needs.
- 2.4 GHz Band: Provides better coverage and ideal penetration through walls. It works well for general browsing, basic tasks, and devices farther from the router.
- 5 GHz Band: Offers much faster speeds and lower latency. This band is best for high-bandwidth activities like online gaming, 4K video streaming, and connecting devices close to the router.
Common WOW! Self-Install Issues and How to Fix Them
WOW! self-installation issues are normal. With a few simple troubleshooting steps, you can fix common problems more effectively and get connected quickly.
Why Isn't My WOW! Internet Working After Setup?
If you still don’t have internet access after activation, follow these steps:
- Check All Connections: Ensure the power cord is firmly plugged into the electrical outlet, the coaxial cable is securely screwed into the cable-in port on the modem, and any Ethernet cables are securely plugged in.
- Reboot the Modem: Unplug the modem power cord from the wall outlet, wait 30 seconds, then plug it back in. Give it several minutes to restart and sync with the network.
- Verify Account Information: Make sure you are using the correct WOW! account number and information provided in your welcome kit when prompted during the online activation process.
Why Are My Modem Lights Flashing?
Flashing lights usually indicate that the modem is still trying to establish a connection with the WOW! network. Solid lights confirm a successful connection.
Light LabelStatus DescriptionTroubleshooting/MeaningPowerReceiving powerCheck the power sourceDS/US (Downstream/Upstream)Connected to the networkSyncing with networkOnline (or Globe icon)Internet connection activeSearching for a connectionWi-Fi (or Wireless icon)Internet connection activeActivity/Data transfer Tip: You must wait until the Online or Internet light turns solid before your service can be activated or used. It may take 5–15 minutes during the initial setup.
How Do I Run a Connection Test?
- Log in to your account portal at login.wowway.com.
- Navigate to the Equipment or My Services tab.
- Select the option to Run Internet Connection Check or Speed Test.
The results will show your download and upload speeds, latency, and packet loss, helping confirm that your service is performing as expected.
When Should I Contact Support?
You should reach out to the technical support team if:
- The Online or Internet light on your modem never turns solid after waiting over 30 minutes and performing multiple reboots.
- You successfully activated your service, but the internet connection keeps dropping out or failing.
Contact Options:
- Live Chat: Available daily from 7:00 AM–11:45 PM EST.
- Phone Support: Call 1-866-496-9669 anytime.
Expert Tips for Faster Setup and Better Speeds
You can streamline your installation process by following a few simple steps.
- Before connecting your new equipment, ensure your old modem or gateway is unplugged from both power and the coaxial outlet to prevent network conflicts during activation.
- For best performance, use a Cat6 (Category 6) or higher Ethernet cable when connecting a computer or router to the modem, as these cables support faster speeds better than older Cat5e versions.
- You should prioritize a wired Ethernet connection over if you stream HD content or play online games.
- Make it a habit to restart your modem once a month. Unplug it for 30 seconds and plug it back in. This clears the device's memory cache and helps refresh its connection to the WOW! network, maintaining optimal performance.
Is WOW! Self-Install Worth It?
Using the WOW! self-installation kit is highly recommended for a quick, convenient setup.
WOW! self-install offers significant benefits, including:
- Convenience: Install your service on your own schedule, day or night.
- No Waiting: Skip appointment windows and technical support queues.
- Easy Activation: The step-by-step process is designed to get you connected in minutes.
We encourage you to use the Online Account Manager at login.wowway.com after setup to run connection checks and manage your services effectively.
Ready to get online? Visit wowway.com/selfinstall and start your setup today!
FAQ
Do I need to call WOW! for activation?
You typically do not need to call WOW! to activate your modem right away. You can complete the activation yourself by navigating to wowway.com/selfinstall in a web browser after connecting your equipment. You will need the last four or six digits of your account number to complete the online form.
How long does WOW! self-installation take?
The physical part of the W OW! self-installation typically takes 30 - 60 minutes. Including online activation and modem rebooting, usually gets you up and running with your service in under an hour, assuming there are no issues.
Can I use my own modem with WOW! Internet?
Yes, you can use your own modem with WOW! Internet service, as long as it is on the provider’s approved list of equipment. To ensure it works correctly, you must verify that your modem is on their list of approved devices for use on their network. Using an unapproved modem may result in connectivity issues or an inability to activate the service.
How do I fix weak Wi-Fi signals in certain rooms?
To improve weak Wi-Fi signals in certain rooms, first reposition your router to a central, elevated location. If dead zones persist, the most effective solution is to install a mesh Wi-Fi system or use a Wi-Fi range extender to expand coverage.
Is WOW! Internet good for gaming and streaming?
Yes, WOW! internet is good for gaming and streaming, especially if you can access their fiber-optic plans. The performance, however, can depend on the specific service type available in your area and on local network conditions.