

Wowway, also known as Wide Open West, is a telecommunications company that offers cable television, high-speed internet, and phone services in selected areas of the United States. Wowway Self Install refers to the process of setting up and installing Wowway services on your own, without the need for a technician to visit your home. This option provides customers with the convenience and flexibility to get their cable television, high-speed internet, and phone services up and running at their own pace.
With Wowway Self Install, you will receive all the necessary equipment, such as a modem and cables, along with detailed instructions on how to connect and activate your services. The self-installation process is designed to be user-friendly, allowing you to easily follow the provided steps and get connected to Wowway's reliable network.
What's Included in Wowway’s Self Installation Kit?

When it comes to installing Wowway services, opting for the self-installation route offers an additional advantage: the self-installation kits provided by Wowway are available free of charge. This is in contrast to the cost associated with having your services professionally installed by a technician.
- Coax Cable: A coaxial cable, commonly known as a coax cable, is a type of electrical cable used for transmitting high-frequency signals. It consists of a central conductor, an insulating layer, a metallic shield, and an outer insulating jacket. Coax cables are widely used in telecommunications and cable TV systems to transmit video, audio, and data signals. They are characterized by their ability to carry high-bandwidth signals over long distances with minimal loss or interference.
- Ethernet Cable: An Ethernet cable, also known as a network cable or LAN cable, is used to connect devices in a Local Area Network (LAN). It is designed to transmit data signals between computers, routers, switches, and other network devices. Ethernet cables typically use twisted pair wiring and follow industry-standard specifications, such as Cat5e, Cat6, or Cat7, to provide reliable and high-speed data transmission. They are commonly used for internet connectivity, file sharing, online gaming, and other network-related applications.
- Modem and Power Cord: The power cord and modem are essential for internet connectivity. The modem acts as a bridge between your devices and the internet service provider, converting signals for data transmission. The power cord supplies the necessary electrical power for the modem to function properly.
- Wow! Installation guide: The Wow! installation guide typically includes an equipment overview, connection diagrams, and activation instructions. It provides information on the equipment included in the installation kit, step-by-step instructions on connecting the components, and guidance on activating your Wow! services. Additionally, the guide may offer troubleshooting tips for common installation issues.
Navigating Wowway’s Self Installation Process
You don't have to be a tech expert to successfully complete any installation process, including the setup of Wow! services. Whether it's connecting your modem, configuring your router, or activating your services, we have provided detailed instructions that are user-friendly and accessible to users of all levels of technical proficiency.
Using a Wired Modem
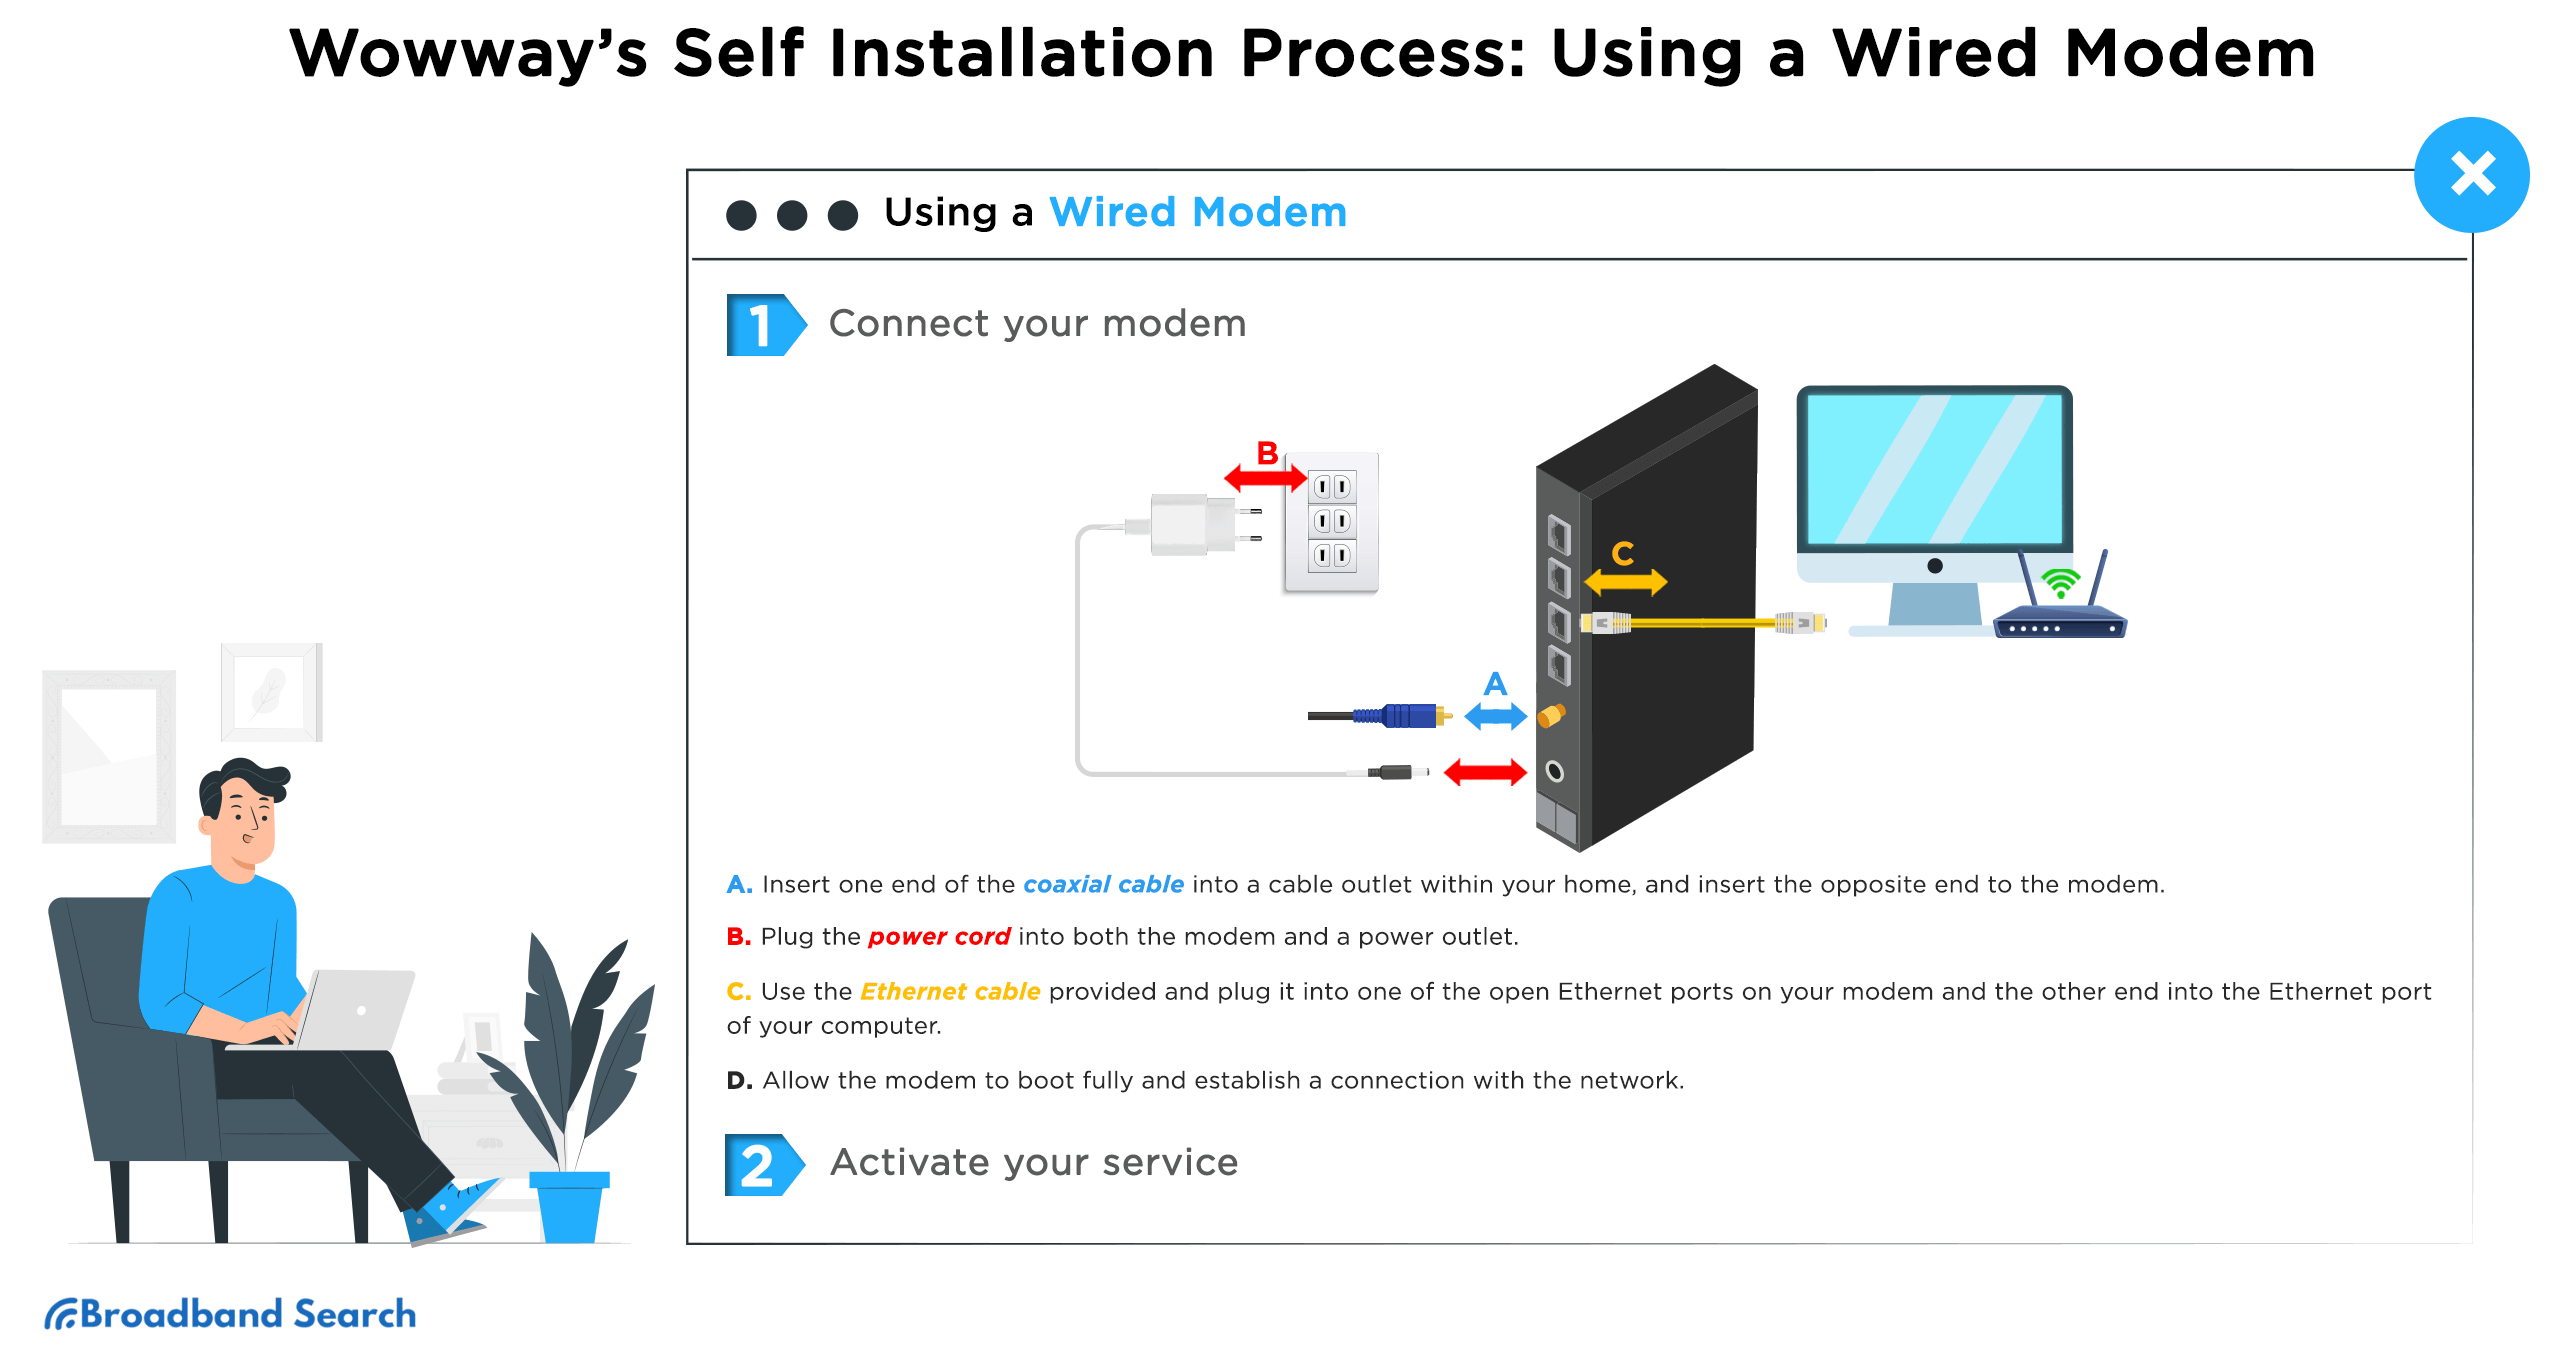
Step 1: Connect your modem
- Connect the coax cable's other end to your modem and one end to a home's available cable outlet.
- To enable the modem to turn on and start booting, plug the power cord into both the modem and a power outlet.
- Connect the Ethernet cable to your modem's open Ethernet port using the supplied Ethernet cable. Connect the other end to your computer's Ethernet port.
- Let the modem fully start up and establish a network connection. Your modem is connected when all of the lights are solid and no longer flash.
Step 2: Activate your service
In order to activate your service, you will need the last four digits of your account number. You can find these four digits in various places, such as your welcome email, the door tag left during delivery, or the sticker affixed to the exterior of your kit packaging.
- Open a web browser on the device that is using an Ethernet cable to connect directly to the modem, and then navigate to wowway.com/selfinstall. There, you will be given instructions on how to activate your modem and create an account. In order for this modem activation site to recognize which modem you are activating, you must visit it with the device immediately connected to the modem.
- After completing the instructions on the modem activation website, your modem should begin to reset in a matter of seconds, though in certain circumstances it can take up to five minutes. Please manually turn off the power for 30 seconds, unplug it for the remaining five minutes, and then re-plug your modem if it does not restart.
- When all lights on the modem are solid and no longer flashing, your modem has been successfully activated. Using the device that is still connected directly to the modem via Ethernet cable, log in to login.wowway.com to register for the online account portal and check the quality of your Internet connection on the Equipment page to verify that the outlet your modem is connected to is providing a good connection.
- Once your connection is established, your modem is now turned on and connected to a reliable outlet. Especially if you purchased our Whole Home WiFi. You can now proceed with setting up your wireless network by following those steps if you use a service or own a personal wireless router.
Using a Wireless Modem
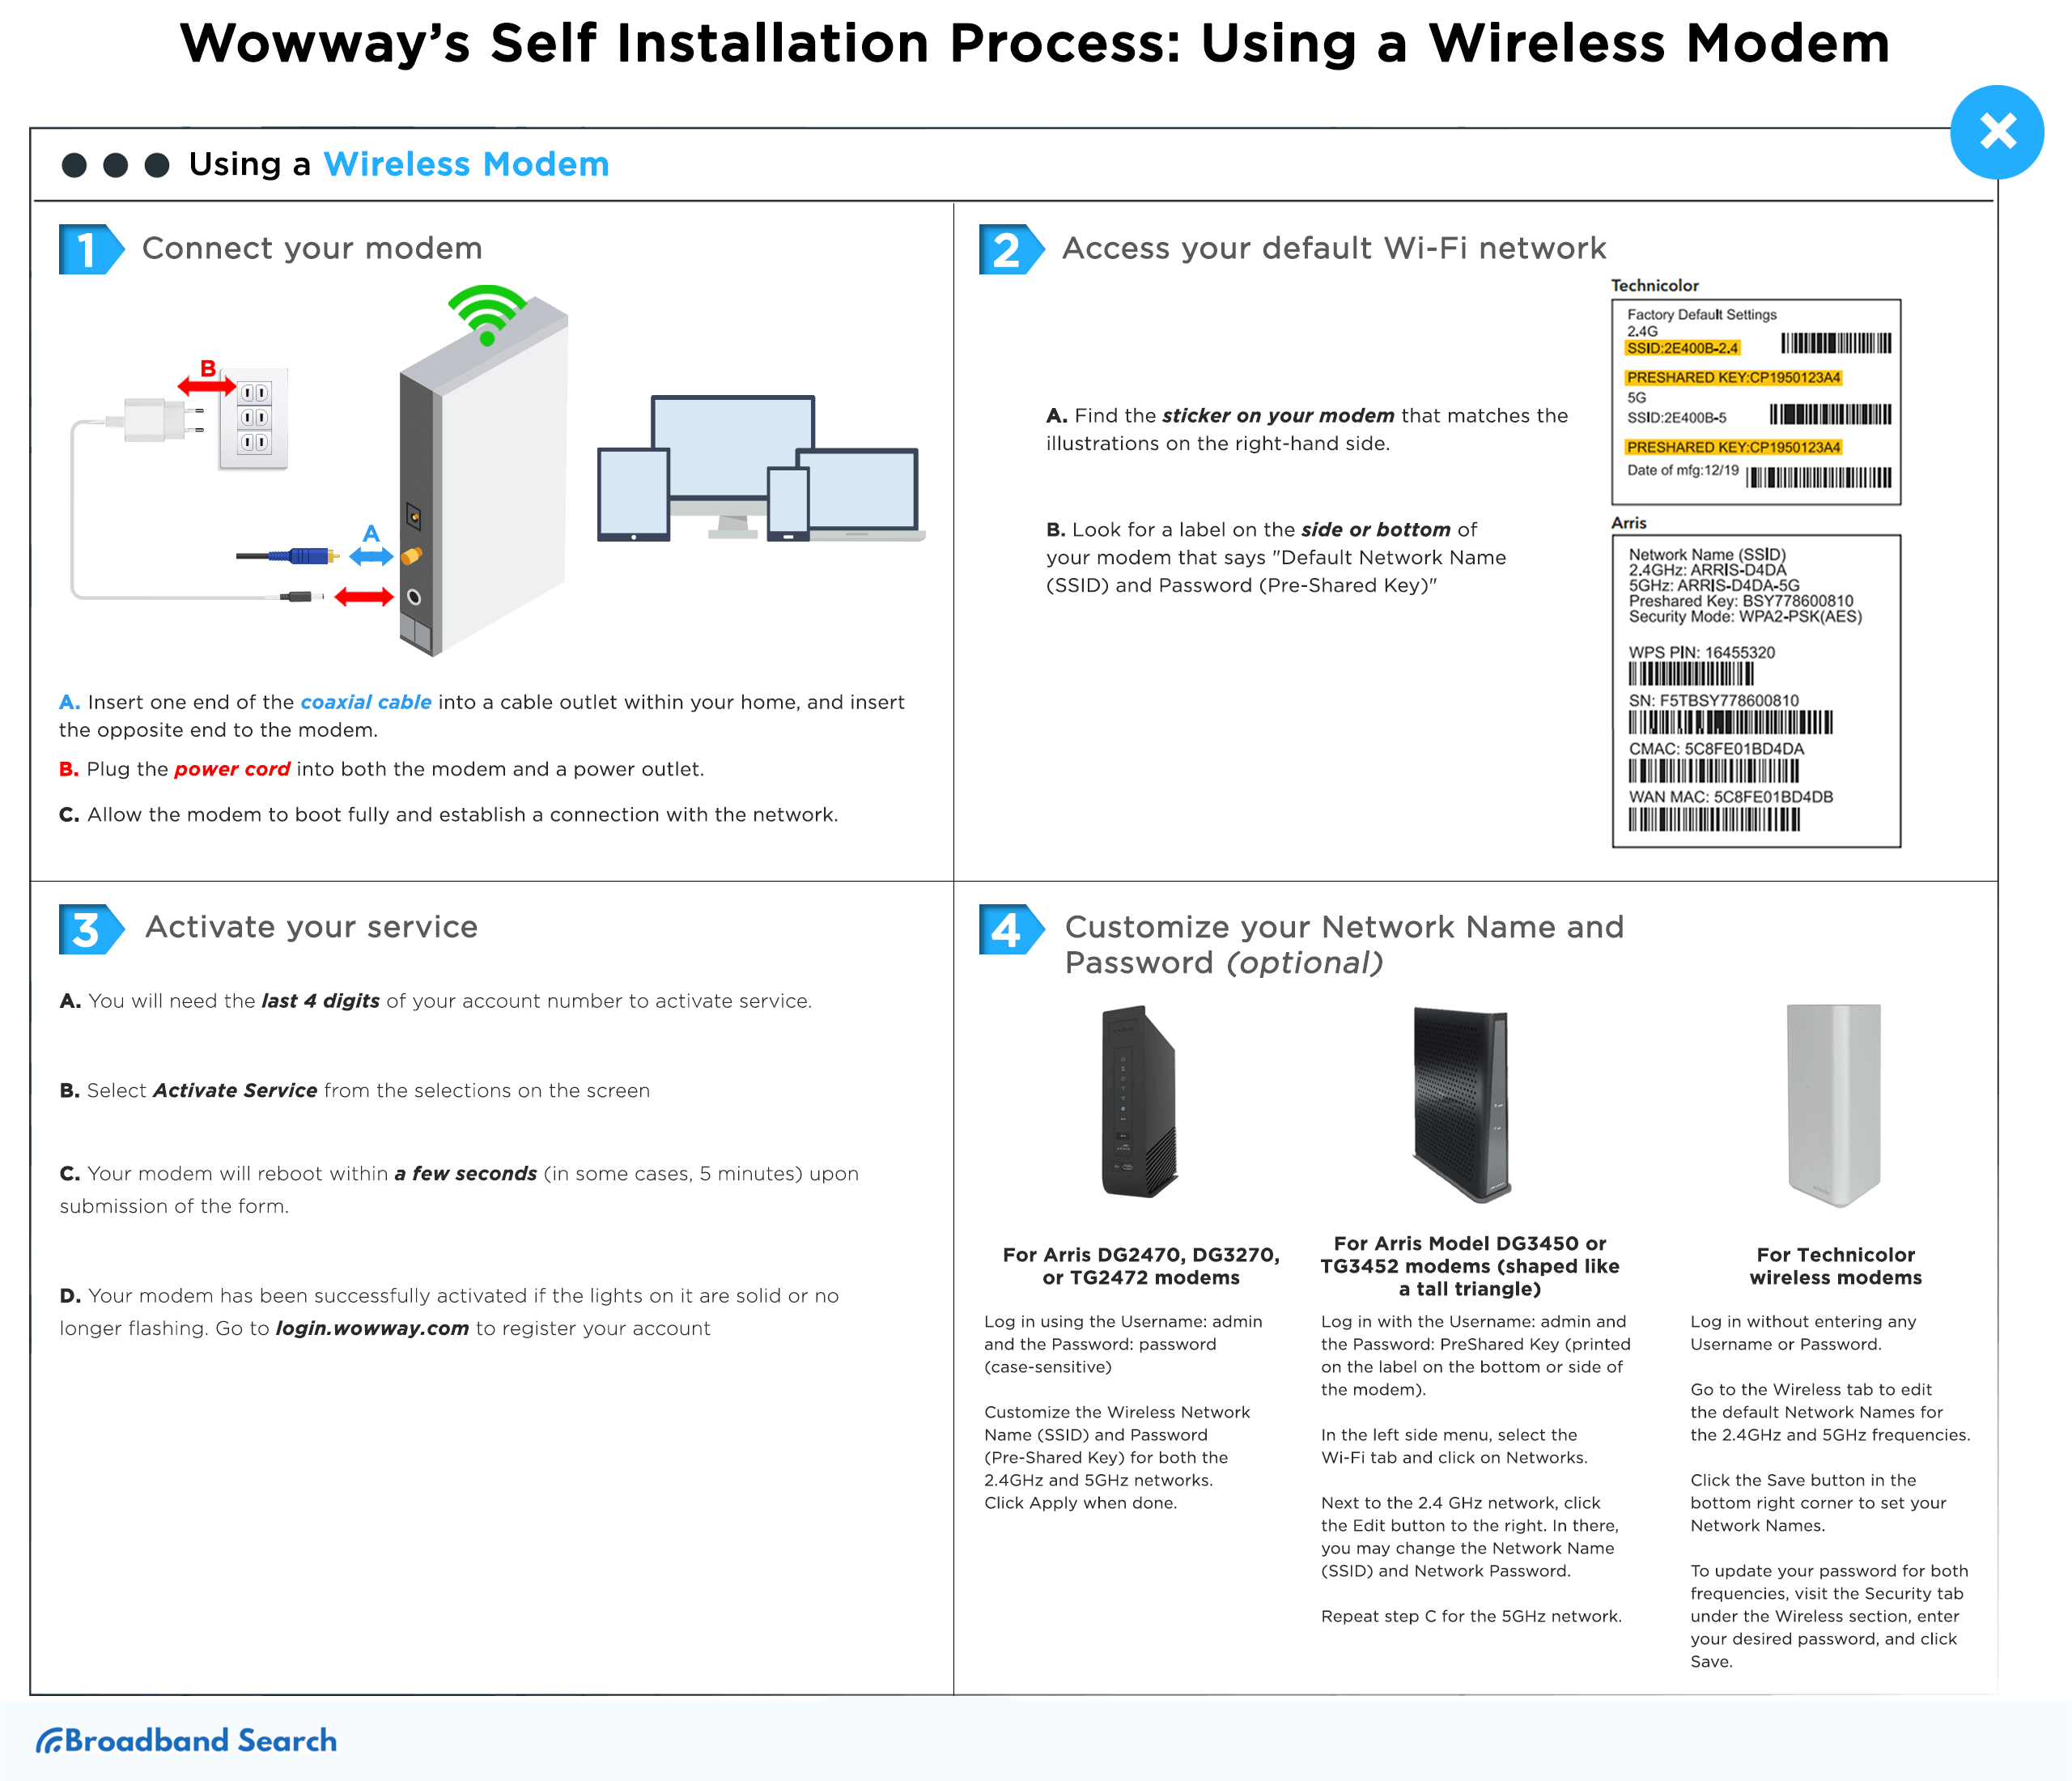
Step 1: Connect your modem
- Connect the coax cable's other end to your modem and one end to a home's available cable outlet.
- To enable the modem to turn on and start booting, plug the power cord into both the modem and a power outlet.
- Let the modem fully start up and establish a network connection. When none of the modem's lights are flashing and are all solid, your modem is plugged in.
- (Optional) Use the Ethernet connection if you don't have a WiFi-enabled device. Connect the included Ethernet cable to one of the available Ethernet ports on your modem. Connect the opposite end to the Ethernet. To activate your service, go to Step 3 after plugging your computer's port.
Step 2: Access your default Wi-Fi network
Find the sticker that corresponds to one of the samples on the right and put it to your modem. You will need this information to wirelessly connect to the modem.
- Look for a label on the side or bottom of your modem that says "Default Network Name (SSID) and Password (Pre-Shared Key)"
- Check your WiFi settings for the default Network Name (SSID), then use the default Password to connect your device (Pre-Shared Key).
Later on, if you'd like, you can change your Network Name (SSID) and Password (Pre-Shared Key). For now use these default settings.
Step 3: Activate your service
To activate your service, you will be required to provide the final four digits of your account number. These digits can be found in several locations, such as your welcome email, the delivery door tag, or the sticker on the exterior of your kit packaging.
- Choose "Activate Service" from the options displayed on the screen. Next, provide your account information to confirm your account and initiate the activation of your service. Please note that if you are using a cell phone browser for this step, it is recommended to disable your cellular data to ensure you access the activation site through the modem being activated. This helps to prevent any interference during the activation process.
- After submitting the form, you should observe your modem initiating a reboot within a few seconds. However, in certain instances, this process may take up to 5 minutes. If your modem does not reboot within this time frame, please manually disconnect the power for 30 seconds and then reconnect it to the modem.
- Once all the lights on the modem are steady and no longer flashing, it indicates that your modem has been successfully activated. The next step is to register your account in the WOW! Online Account Manager. This user-friendly platform serves as a central hub for managing your account, making payments, and more. Simply visit login.wowway.com to register your account. Once logged in, navigate to the Equipment tab and click on "Run Internet Connection Check" to ensure everything is functioning smoothly. Additionally, you can adjust your network settings as necessary within the Equipment tab.
- Once your connection passes the check, your WOW! Internet is ready to be used.
Step 4. Customize your Network Name and Password (optional)
To access the device administration page, open an Internet browser window and enter 192.168.0.1 in the address bar, then press Enter. Follow the steps below based on the model number of your wireless modem:
- For Arris DG2470, DG3270, or TG2472 modems:
- Log in using the Username: admin and Password: password (case-sensitive).
- Customize the Wireless Network Name (SSID) and Password (Pre-Shared Key) for both the 2.4GHz and 5GHz networks. Click Apply when done. Previously connected devices will automatically connect to the wireless router.
- For Arris Model DG3450 or TG3452 modems (shaped like a tall triangle):
- Log in with the Username: admin and the Password: PreShared Key (printed on the label on the bottom or side of the modem).
- In the left side menu, select the Wi-Fi tab and click on Networks. The 2.4GHz and 5GHz Home Wi-Fi Networks will be listed.
- Click the Edit button next to the 2.4GHz network to modify the Network Name (SSID) and Network Password. Enter the correct CAPTCHA, then click Save.
- Repeat step C for the 5GHz network.
- For Technicolor wireless modems:
- Log in without entering any Username or Password.
- Go to the Wireless tab to edit the default Network Names for the 2.4GHz and 5GHz frequencies.
- Click the Save button in the bottom right corner to set your Network Names.
- To update your password for both frequencies, visit the Security tab under the Wireless section, enter your desired password, and click Save.
Using a Custom Modem
If you plan to use your own modem, WOW! will provide you with the necessary coax cable and install guide. However, it's important to note that you will need to provide your own modem, power cord, and Ethernet cable. WOW! ensures that you have the essential components to connect your modem to their network, while the responsibility of acquiring and setting up your own modem and related accessories lies with you.
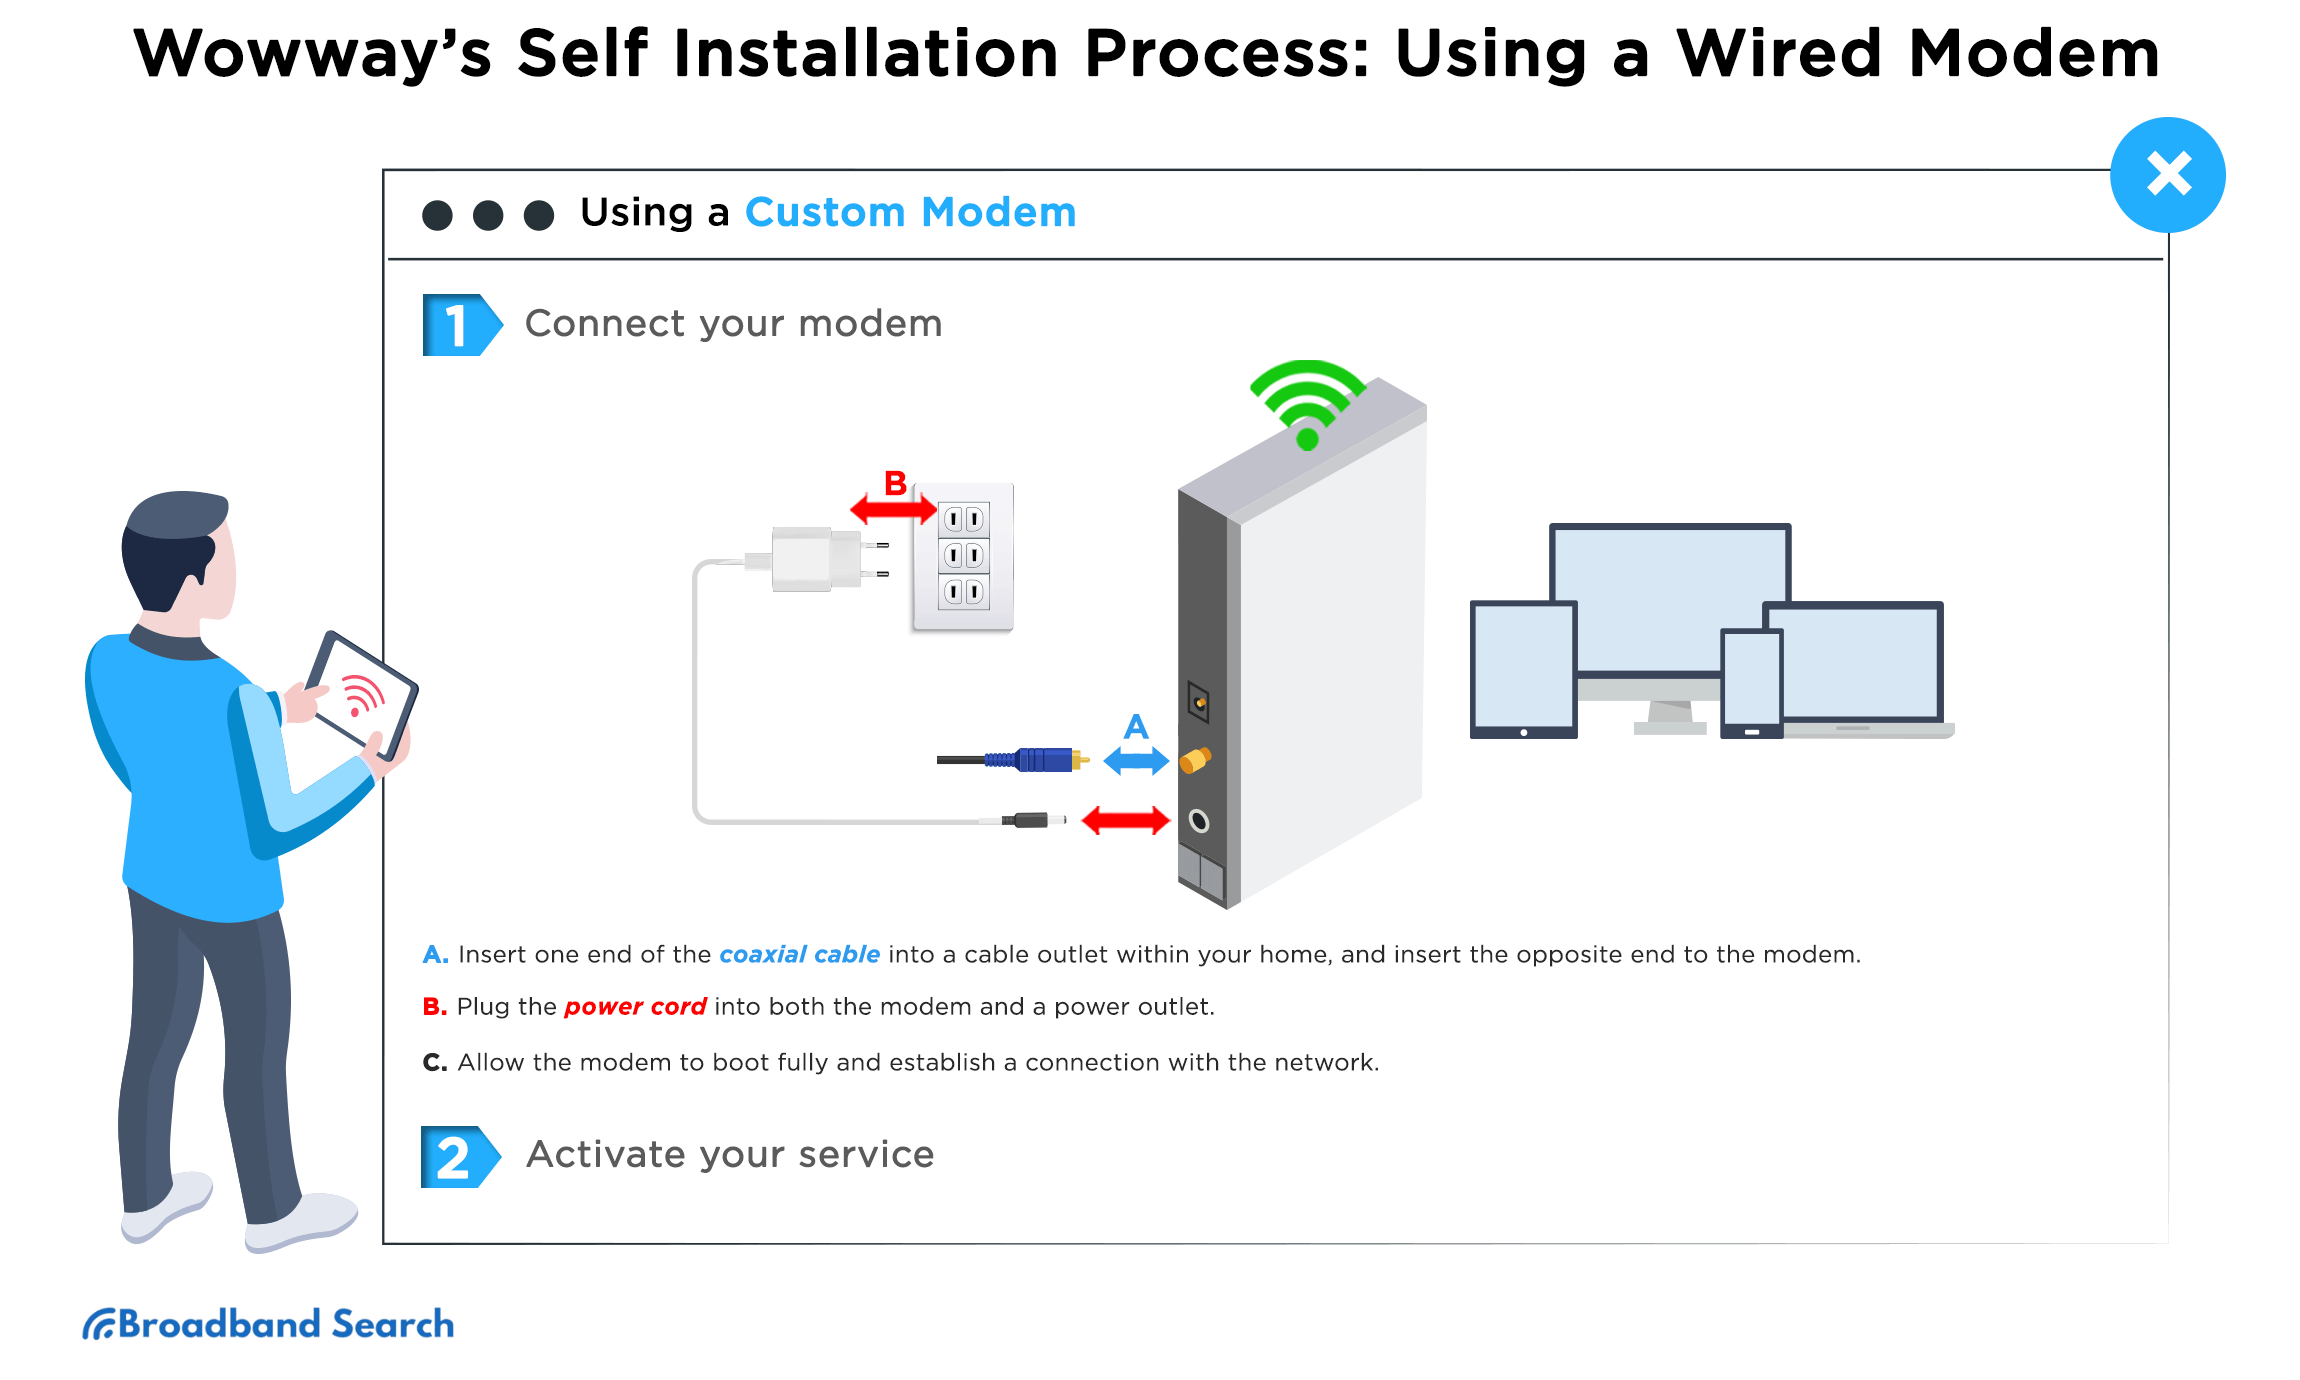
Step 1: Connect your modem
- One end of the coax cable should be plugged into a residential cable outlet, and the other end should be connected to the modem. Replace an existing Internet device by connecting a new one to the same outlet after disconnecting the old one. Your cable outlet might be on the floor or on the wall. It is also important to tighten the connections by hand.
- In order to enable the modem to power on and start booting, plug the power cord into the outlet and the modem.
- Let the modem fully start up and establish a network connection. When the modem's lights are entirely solid and not flashing, your modem is connected.
- Set up a modem connection on your device. This can be done by connecting to the wireless network using the information provided by your modem manufacturer’s manual or through an Ethernet connection.
Step 2: Activate your service
In order to activate your service, you will be required to provide the last four digits of your account number. These can be found in multiple places, including your welcome email, the door tag left during delivery, or the sticker affixed to the outside of your kit packaging.
- Choose "Activate Service" from the available options on the screen. Proceed to enter your account information to verify your account and initiate the activation process. Please note that if you are using a cell phone browser for this step, it is important to disable your cellular data to ensure that you access the activation site through the modem you are activating. If you access the activation site through your cellular data instead of the modem's internet connection, the modem will not be detected, and activation will not be possible.
- After submitting the form, you should observe your modem initiating a reboot within a few seconds. However, in some cases, this process may take up to 5 minutes. If your modem does not reboot within this timeframe, please manually disconnect the power for 30 seconds, then reconnect the power to your modem.
- Once all the lights on your modem are solid and no longer flashing, it indicates that your modem has been successfully activated. The next step is to register your account in the WOW! Online Account Manager, which provides a convenient platform to manage your account, make payments, and access additional features. To register, simply visit login.wowway.com and log in. From there, navigate to the Equipment tab and select "Run Internet Connection Check" to ensure a smooth connection. You can also update your network settings as necessary on the Equipment tab.
- Once your connection successfully passes the check, you are all set and ready to enjoy your WOW! Internet service. Your internet connection is now fully operational.
- (Optional) If you wish to customize your network name and password, please refer to the documentation provided by your modem manufacturer. They will provide instructions on how to personalize these settings according to your preferences.
Common Troubleshooting Methods During the Self Installation Process
When it comes to self-installation processes, encountering challenges or difficulties is not uncommon. Whether you're setting up a new device, assembling furniture, or following instructions for a DIY project, it's important to be prepared for potential troubleshooting. Troubleshooting refers to the process of identifying and resolving problems that may arise during the installation process. This can save you time, frustration, and ensure successful completion of the task at hand.
Check if your Internet Service or Modem isn’t Working
If you are experiencing issues with your internet service or modem, it's important to follow a systematic approach to identify and resolve the problem. It is important to pause and test your internet connection after each step to see if the problem has been resolved. By taking this approach, you can identify the specific step that resolves the issue or determines the cause of the problem. Remember, if your problem is resolved, you can stop troubleshooting and continue using your internet service.
Step 1: Check their coaxial cable, power, Ethernet/USB, and modem connections are tight.
Step 2: Ensure that the modem has power by verifying that the power light is lit up. If there are no lights on the modem, make sure that the modem is plugged into an active power outlet.
Step 3: If the modem is plugged in but has no lights, try a second power outlet or bypass surge protector. A surge suppressor, also known as a surge protector, is a device designed to protect electronic equipment from voltage spikes or transients. It is connected to the alternating current (AC) utility line and/or telephone line to prevent damage to the equipment caused by sudden increases in voltage.
Step 4: If the modem is plugged in but has no lights, unplug the modem's power cord, wait two minutes, then plug it back in.
Step 5: If the lights do not go off when unplugging the modem, you have an advanced modem that has a battery in it. You will need to press the "Reset" button on the back of the modem for 5 seconds. Do not hold the "Reset" button for more than 5 seconds as this can cause the wireless settings to be reset to factory defaults.
Step 5: Wait until the lights on the modem stabilize. For the first several seconds, they will blink and turn on and off.
Step 6: Restart your computer.
Run a Service Quality Check
WOW! provides convenient tools within the Online Account Manager that allow you to test the quality of your internet connection. These tools enable you to assess various aspects of your connection, including internet speed, latency, and overall performance.
Step 1: Login to https://identity.wowway.com/ in order for you to access the Online Account Manager.
Step 2: Navigate to the Equipment page to perform a service quality check.
Step 3: Wait for the test to complete and it will indicate if any problems are detected and follow the prompts provided for resolving those issues.
Contact Wowway’s Customer Support
If you have followed the troubleshooting steps and the issues with your WOW! internet service persists, it may be time to reach out to WOW! customer support for further assistance. They have a dedicated team of experts who are available to help you resolve any technical issues or concerns you may have.
You can engage in a live chat with their support team, available daily from 7:00 am to 11:45 pm EST. Just click on the "Chat Now" button to initiate the conversation. Alternatively, you can reach out to WOW! customer support by phone, as they are available 24/7. Simply dial 1-866-496-9669.
Whether you're facing connection issues, technical problems, or need help with getting devices connected, the WOW! support team is ready to assist you promptly and efficiently.
The Bottom Line
WOW! Internet self-installation is a simple and easy process. Once you have your self-installation kit, you will wonder why anyone pays for professional installation. The greatest advantage is that you don't have to wait for a technician to arrive. You can complete the installation at your own convenience, without interrupting your schedule. It's a cost-effective and convenient option that allows you to set up your internet service on your own terms. Say goodbye to waiting for technicians and enjoy the satisfaction of installing WOW! Internet yourself.
FAQ
Do I need to call my ISP if I get a new modem?
Yes, it is generally recommended to contact your Internet Service Provider (ISP) if you get a new modem. Your ISP needs to be aware of the new modem in order to update their records and ensure a seamless transition of service. They may need to provision the new modem on their network, verify its compatibility, and assist you with any necessary configuration settings.
Is Wowway Internet fast enough for gaming?
Yes, an internet speed of 20 Mbps or higher is generally considered ideal for gaming, especially for multiplayer or competitive gaming. WOW! Internet offers a range of speeds from 100 to 1200 Mbps for download and 10 to 50 Mbps for upload. These speeds are well-suited for various online activities, including gaming.
How much does it cost for their professional installation service?
Most new customers can receive a free self-installation kit, but if you opt for professional installation, there is a $75 fee. However, the advantage of professional installation is that WOW! waives the $10 activation fee, making it only an additional $65 to have the assistance of a technician.
Is it better to connect to 5GHz or 2.4 GHz?
When it comes to choosing between 5GHz and 2.4GHz, it depends on your specific needs and circumstances. The 5GHz band generally offers faster speeds and less interference, making it ideal for high-bandwidth activities like gaming and streaming. On the other hand, the 2.4GHz band has better range and can penetrate walls and obstacles more effectively, making it suitable for wider coverage and connecting devices that are farther away from the router. Consider your priorities, the devices you use, and the environment in which you'll be using them to determine which band is better for your situation.
Where is the best place to put my modem?
The best place to position your modem is in a central location within your home. This central placement helps ensure that the Wi-Fi signal is distributed evenly throughout your living space. Additionally, it is advisable to keep the modem elevated and away from obstructions such as walls, furniture, and electronic devices that can interfere with the signal. Providing proper ventilation for the modem and placing it near a power outlet are also important considerations.